一、环境配置
node.js
1.介绍
node.js官网:https://nodejs.org/zh-cn
Hexo 是一款基于 node.js的静态博客框架,所以需要配置好node.js环境。
2.环境配置步骤
首先去node.js官网下载稳定的预构建安装程序,之后新建文件夹将安装程序放入,启动过程中可以更改文件储存路径(虽然但是还是不建议放c盘)

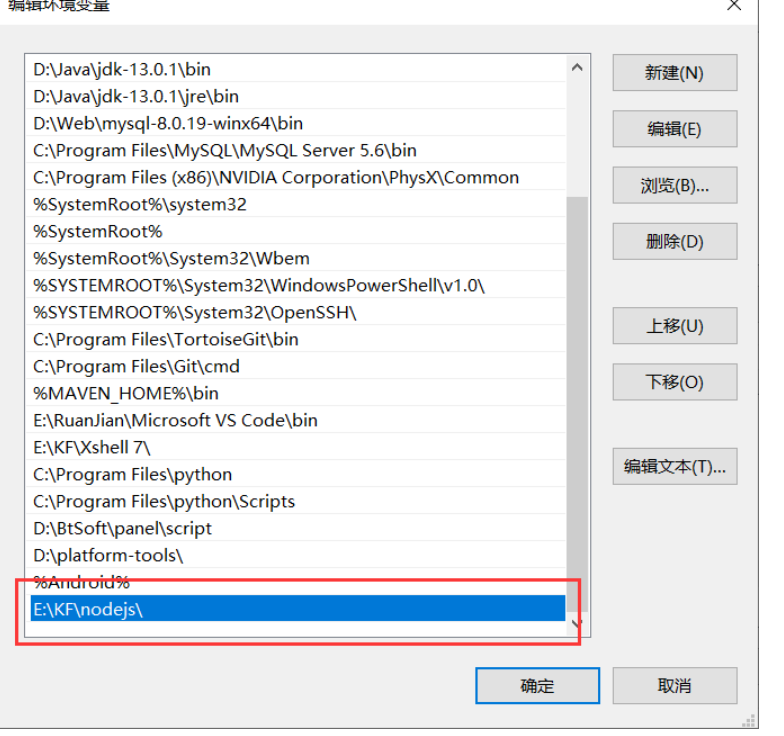
然后在电脑设置中搜索高级系统设置,点击环境变量。这时你会发现预安装程序已经将node.js的环境变量写入系统变量(环境变量)了。


之后点击win+R,输入cmd,打开终端输入node -v和npm -v查看版本,发现已经出现版本号。


之后在存储node.js的文件夹中新建两个文件夹【node_global】和【node_cache】

之后在用户变量的PATH里,将默认的 C:APPData\Roaming\npm 修改成 C:\Program Files\nodejs\node_global

完成后我们退出来,在系统变量处新建一个NODE_PATH,并写入
G:\xxx(自己保存node.js的文件夹位置)\node.js\node_global\node_modules

之后我们进入系统变量的PATH里新建一个变量%NODE_PATH%,还有另外两个变量%NODE_PATH%\node_cache和%NODE_PATH%\node_global

然后进行测试:npm install express -g // -g是全局安装的意思,尝试下载看是否报错。

没有梯子就更换国内镜像源:
1 | npm config set registry https://registry.npm.taobao.org |
GIT
下载地址:https://git-scm.com/download

之后将下载的预安装包找一个文件夹放,之后除了安装路径,无脑下一步就行,想改文末有参考教程,很详细。

git的使用:鼠标右键文件夹,如果没有git bash,如下图,就点击显示更多选项


二、hexo下载
我们这里建议新建一个文件夹,放hexo,之后git bash打开位置放在hexo文件夹中,之后输入
1 | npm install -g hexo-cli #如果出现报错,尝试在命令前加上npx,下文hexo内 容同理 |
下载完成之后输入 hexo -v查看版本,有版本显示就说明下载完成。
之后进入hexo文件夹中,输入一下命令初始化文件夹。
1 | hexo init |
这样本地的网站配置也弄好啦,输入【hexo g】生成静态网页,然后输入【hexo s】打开本地服务器(ctrl+c关闭本地服务器),之后就可以在浏览器的url栏输入localhost:4000,本地博客就搭建完成了。

三、github托管
注册一个github账号:https://github.com/
新建一个仓库,your repositories,新建一个仓库。


填写内容如下,选一个喜欢的名字但是后缀不能改变。

ssh私钥连接
在git bash输入以下命令
1 | #第一次使用git后需要将用户名和邮箱进行初始化 |
用以下命令检查是否输对
1 | git config user.name |
然后一直回车(enter),之后输入以下命令进行邮箱验证。
1 | ssh-keygen -t rsa -C "youremail" |
之后电脑c盘/用户/电脑用户名,文件夹中会出现一个.ssh文件夹,如下图,右键记事本打开其中的id_rsa.pub,复制所有内容。

之后来到github,点击头像,点击setting,在ssh和gpg key里点击NEW ssh key,之后输入复制的内容(名字随便起)


之后在git bash里输入ssh -T git@github.com,如果出现下图(你的用户名),就说明成功

之后我们就可以配置hexo文件夹中的_confing.yml配置文件了,repository修改为你自己的github项目地址
1 | # URL |

1 | deploy: |

或者

之后输入以下命令,下载插件,将生成网页通过git方式上传到你对应的链接仓库中。
1 | npm install hexo-deployer-git --save |
之后输入
1 | hexo clean |
将配置文件上传到git仓库中,这三个命令一般都是一起使用的
第一次hexo d的时候可能会有密码(你的github密码)
之后访问https://github.com/xxx(用户名)/xxx.github.io.git就可以访问你的博客了。
四、next主题配置
参考链接Hexo-Next 主题博客个性化配置超详细,超全面(两万字)_hexo next 记录访问了ip-CSDN博客
参考链接Hexo Next 主题安装、配置及美化 | Hello Memo (iitii.github.io)
文章参考和部分图片来源:
node.js下载和环境配置:http://t.csdnimg.cn/GpuGX
git下载和环境配置:http://t.csdnimg.cn/cuSYy
hexo+git个人博客搭建:http://t.csdnimg.cn/7UFPd


